
One of the things I most enjoy is hearing stories about how Sourcebook readers have put the info to good use by building their own DIY Sprinter conversions, then getting out there and having an adventure, and especially the big road trips! Dakota and Chelsea Gale built their own rig, then dropped everything and left rainy Portland to hit the open road for four months. I asked them to chat about their build, and about their reasons for their time away.
First and foremost, what’s the reason for the big trip?
“People ask why we moved out of our home to hit the road in a Sprinter van. A reverse American Dream in many ways, right? Stability traded in for the unknown, with all the headaches that traveling daily bring with it. And all the adventures, good or bad…I don’t have a clear answer to this. Something that struck me is that we are transitioning from holding down the fort, as the inspiring Colin Wright writes about. After seven years of hard work in Portland, we’ve laid a strong foundation of people, place and work to stretch from, to push some boundaries and explore for awhile. Somewhere along the way, perhaps life just got too easy? In our 1st-world-problems life, a nice home became merely another thing to maintain, a big time-suck of a residence only to have a place to sleep at night. I feel like I know only what I experience, so time for a new challenge and changing horizons.”
“The counterpoint to all this exploring the Beginner’s Mind. Chelsea introduced me to this long ago and describes it as approaching everything as if experiencing it for the first time. Why am I not content waking up in the same place every day and just being, not doing. As my mother, a Buddhist, likes to say, “Wherever you go, there you are.” I’m different every day based on experience from the day prior, so my relationship with my surroundings and the people around me is fresh and new. I recognize this “moving on” could just be running from something, yet I don’t have a grasp as to what that is, if anything. Is it just who I am, or a deeper sense of dissatisfaction I can’t pin down?”
“Goals for the trip are few…and yet probably still too many! After a long break, I want to write more and take more photos. Hence, the blog. I want to play my guitar. And run. And ride my bikes (mountain and road versions are with us). And visit friends and family along the way, and talk to random strangers. And I want to enjoy it all with Chelsea while overlooking the ocean while sea lions bark down below, or big redwoods sway in the winter breeze, or waves crash on a sunny (<–key word) beach. Slow down, relax a little, and take it all in.”
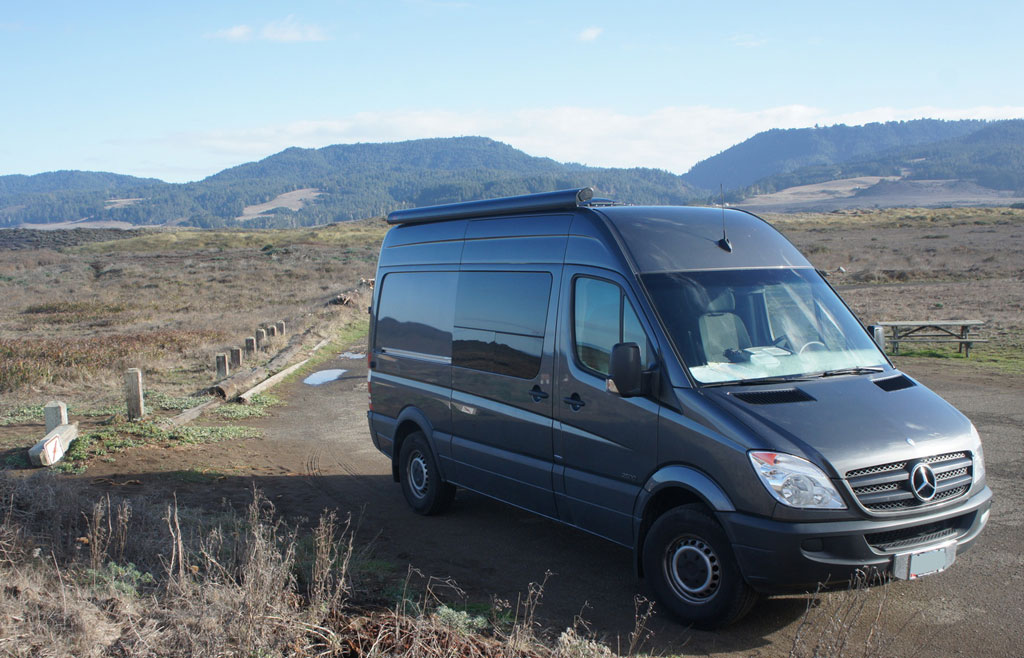
What were your reasons for doing this conversion on a Sprinter, and a 144″ Sprinter 2500 at that (for instance, how did you learn about the Sprinter van, and were there particular things that attracted you to the type of van you chose)? Did you consider any other vehicles?
“We started out looking at VW Vanagons, then Eurovans, briefly other vans, and then the Sprinter. The headroom and solid engine power with decent fuel economy plus durability were the primary driving factors in choosing our Sprinter. The 144″ Sprinter model keeps it manageable in cities and on tight back roads – my wife is totally comfortable driving it – and allows us to have only the van as a daily driver, though we typically ride our bikes in the city. We bought a new van because used vans were so similar in price unless they had a ton of miles on them.”
What were your major design goals? Did you have specific needs that weren’t met by commercial conversions?
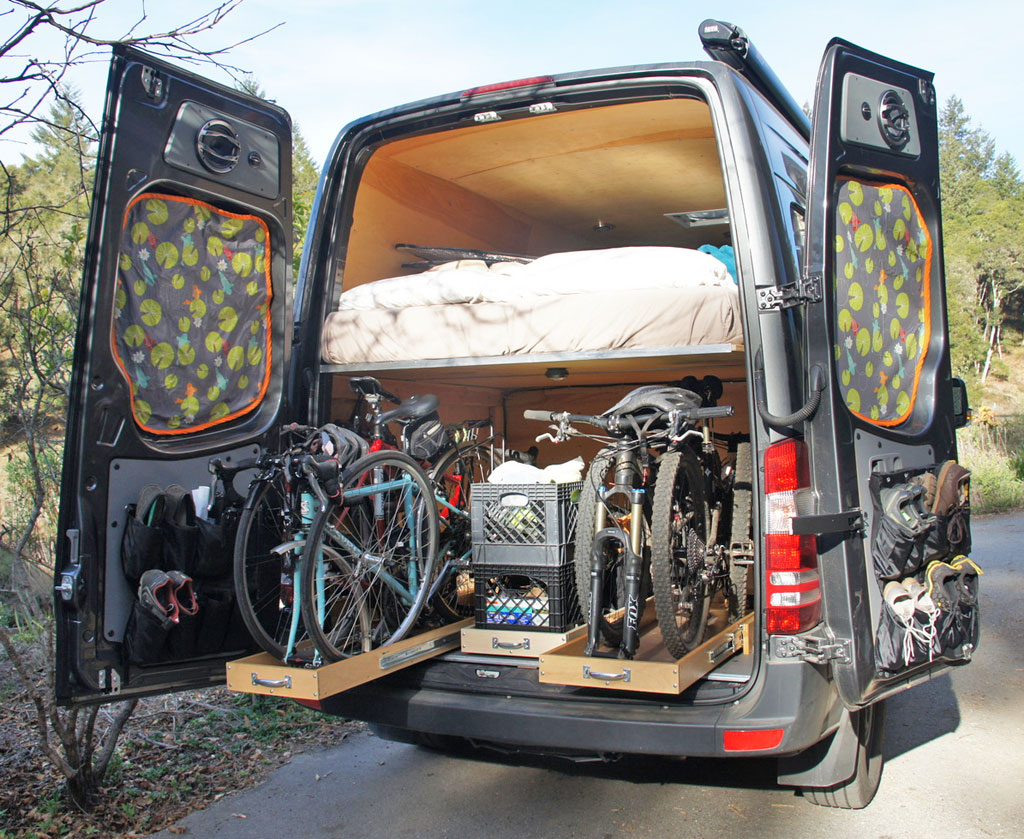
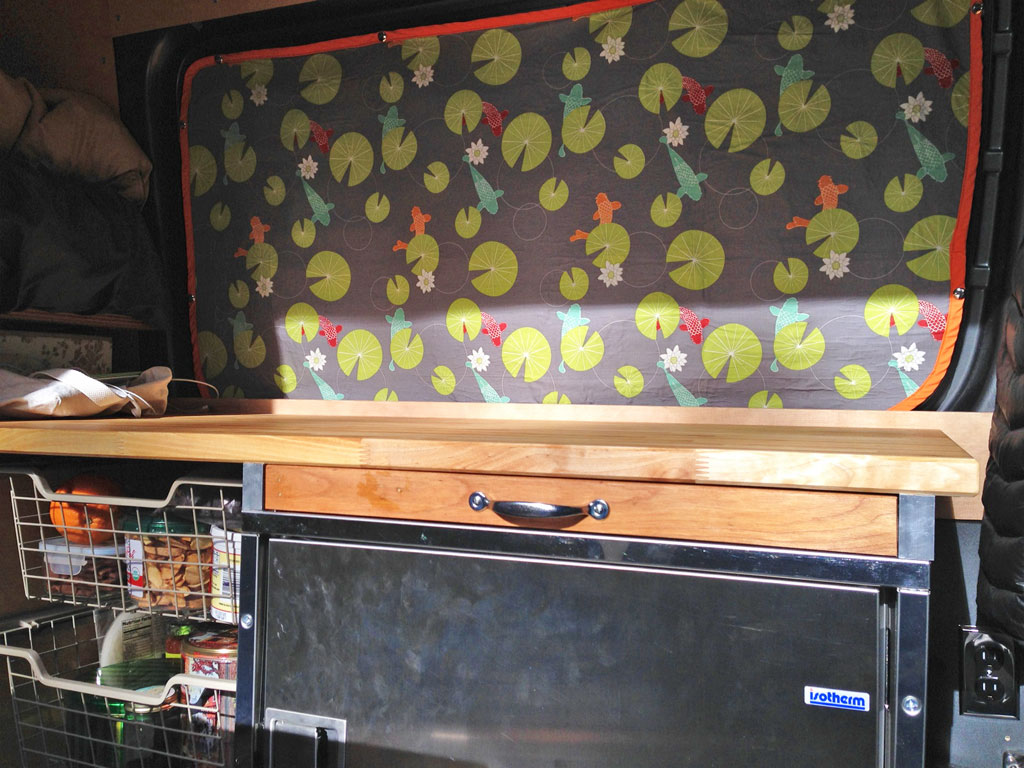
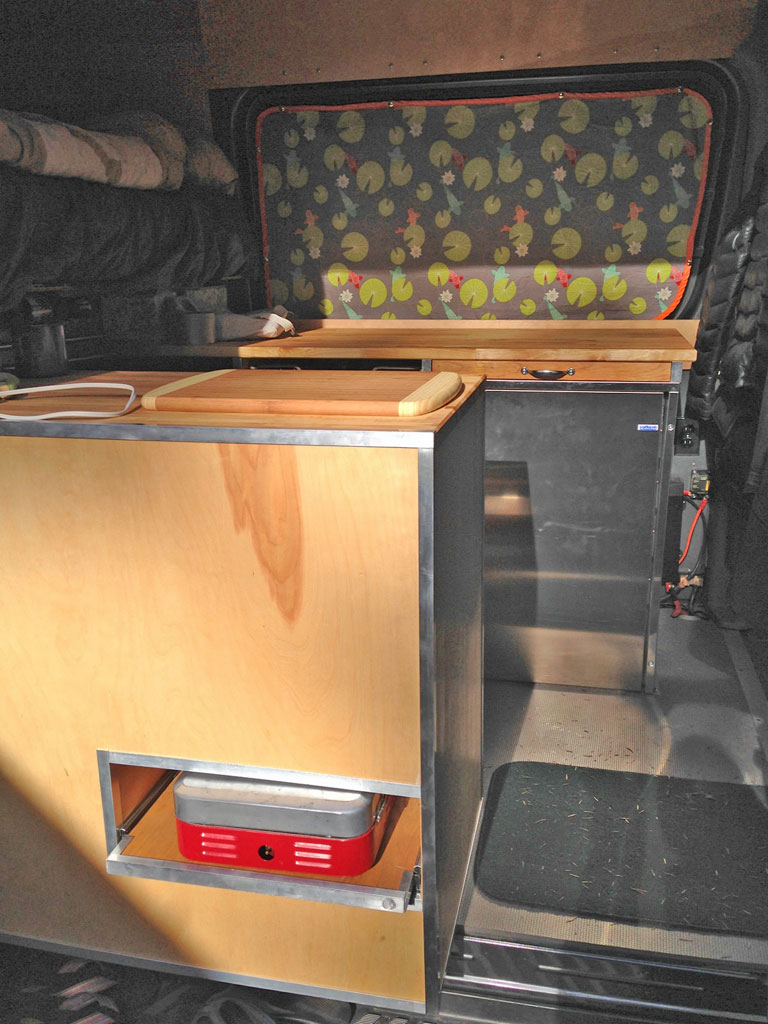
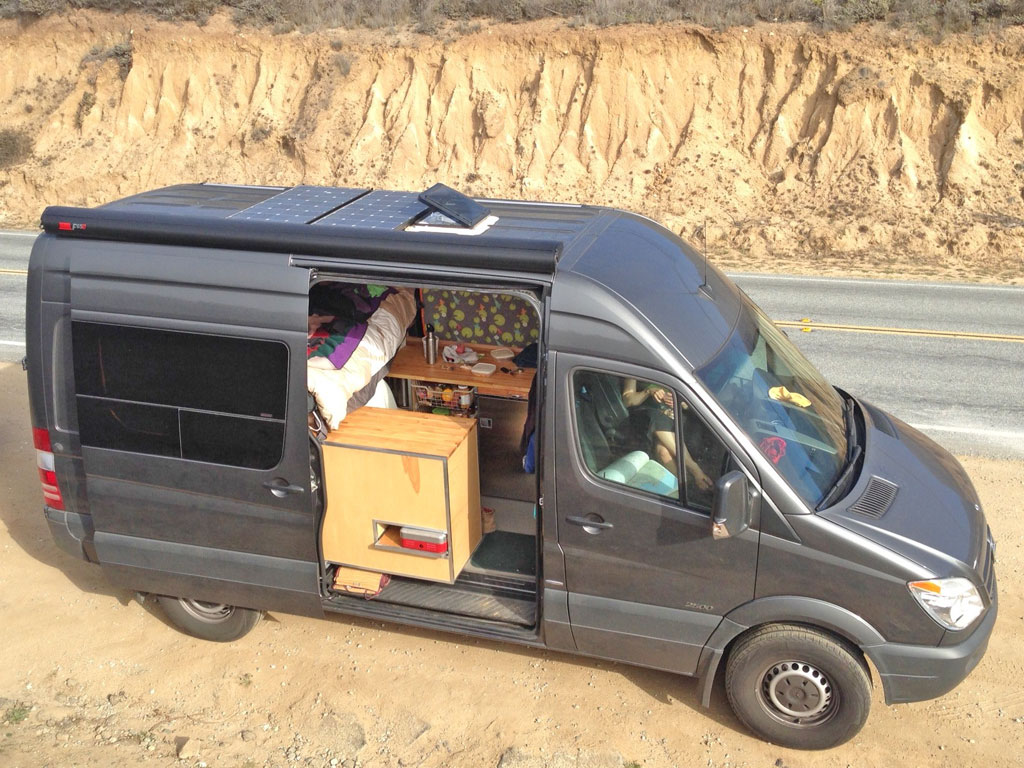
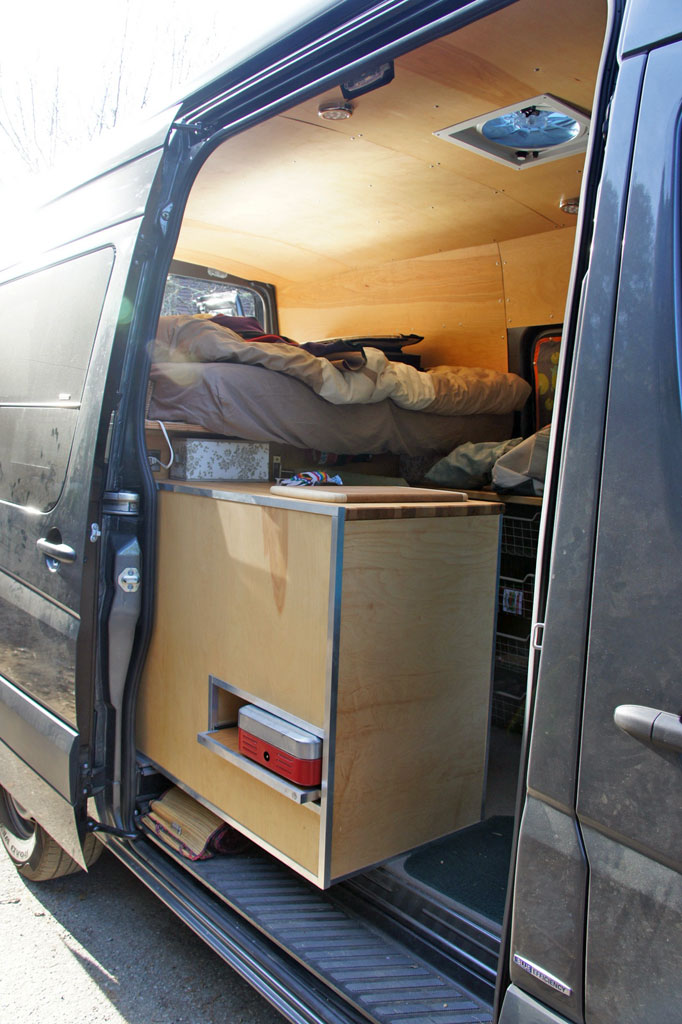
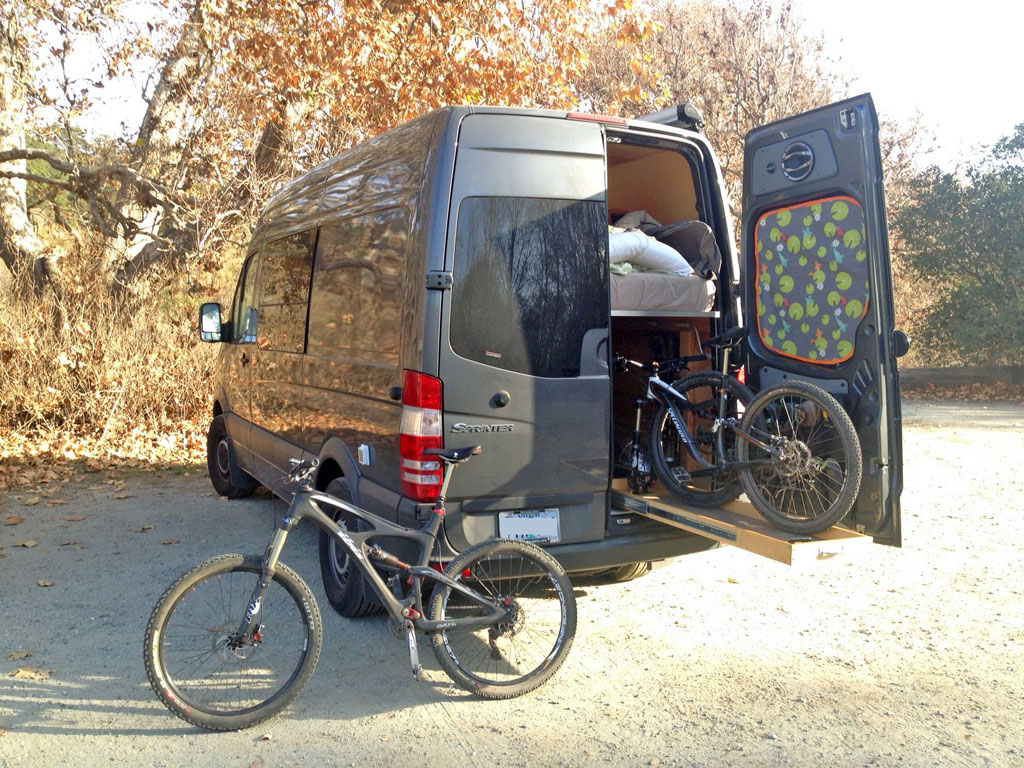
“Two things primarily drove our design: a comfortable bed and room to store four bikes inside the vehicle. It’s a big space sacrifice, but has worked very well for us and keeps things on the down-low when we’re parked in cities or at trail heads. Commercial conversions have their way of doing things, which come at a hefty price, and customizing a template design adds even more cost, so we did most work ourselves. The goal was to keep it as simple as possible and then add items later. For instance, we added a third storage drawer in the bike garage and lighting mid-trip after we decided where we wanted the LED lights to be located, and will also add a sink with a custom-made stainless steel water tank now that we have a sense of how much water we use.”
Did you end up doing several designs, or just one?
“Just one. After weekend trips for about six months, we’re on a long road trip while I work remotely testing it out and there may be iterations, but we’re lucky that so far it seems to be working well!”
About how long did the conversion take you to design and build, and roughly how much did it cost?
“Build time was about 2 months of on-and-off efforts around work and summer trips. The build totaled $22,000, plus the van. I estimate that the build we’ve done would have cost about $40-$50k if we’d had it built custom by a customization company.”
What are the features of the design that you feel turned out the best?
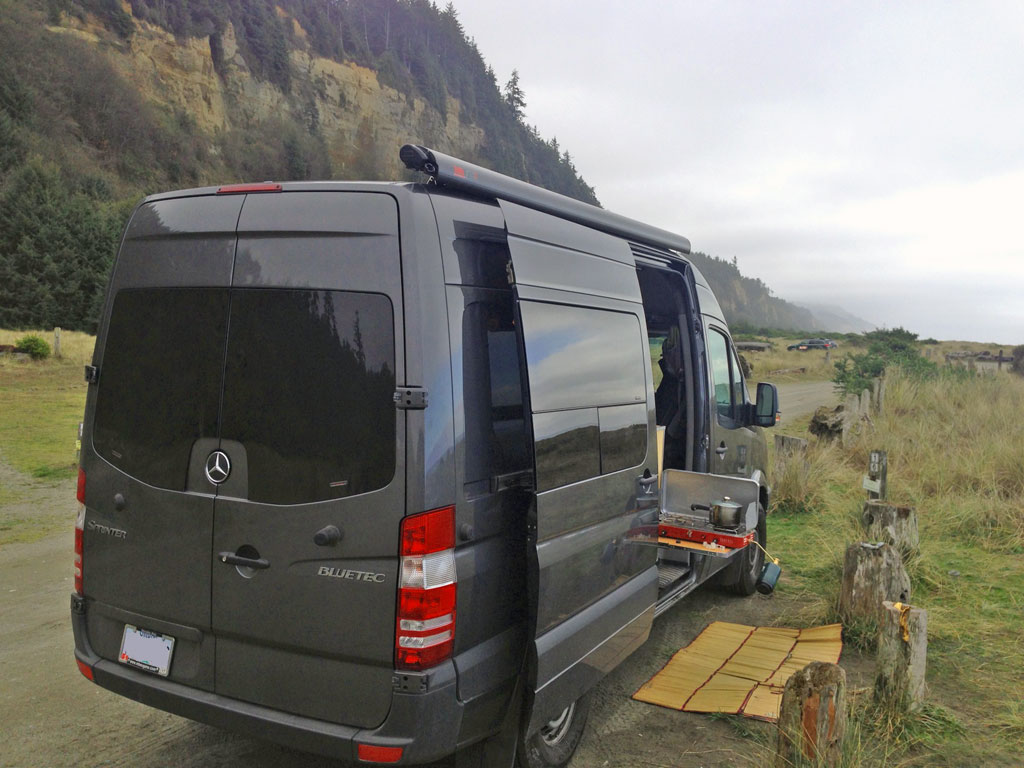
“The interior bike racks are fantastic. We have two mountain bikes and two road bikes inside the vehicle under the bed, yet still have storage space between the bikes in the middle of the vehicle. The passenger sliding door cabinet has turned out to be a great use of space and has provided a lot of storage and countertop for an otherwise unused area. The solar power on top was both a fun project and is very handy. We have 200W of power juicing the fridge and a 2000W inverter that can run a Vitamixer and a hot water boiler, both of which we travel with. Gotta get those healthy morning smoothies! As a small item, the shoe pockets on the rear doors free up a ton of space. Swivel seats are handy too. A final addition before we left was the sliding tray with the stove on it, which lets us cook outside or inside depending on the weather.”
What are the things you wish you’d done differently?
“Installed the heater before we went to Idaho in November! I would run wiring chases in the vehicle to avoid having to remove paneling to add wiring. I may also not have soundproofed/dampened the entire vehicle other than a layer of absorptive material on the floor. Our van is very quiet and doesn’t have much vibration noise, but I don’t know if that’s the insulation and paneling or the layer of Raammat over the metal shell. We’re considering overhead cabinets for a little more storage, just to spread things out a bit, though it seems like we’re in good shape. DIY – you just never know until you try something.”
Dakota Gale’s DIY Sprinter – Equipment List
- Windows – CR Laurence (both sides and rear)
- Ventilation – FantasticFan 6600R
- House batteries – 2 FullRiver DC224-6 224 Ah batteries
- Inverter – Xantrex PowerWatt SW2000
- Solar panels – Grape Solar 2x100W
- Charge controller – Blue Sky Solar Boost 2512i MPPT 12V 25A
- Awning – Fiamma F65s
- Stove – Coleman (not attached to anything)
- Refrigerator – IsoTherm IsoTherm CR130 4.6cf
- Heater – Espar D2 Airtronic
- Lighting – West Marine 12v LED (one diffuse and two spot)
- OBDII scanner – ScanGauge II
- Sound deadening – walls/roof with Raamat, floor with Cascade Audio sound absorption layer
- Cabinets/bike racks – maple plywood
- Bike rack sliders – 48″ heavy duty sliders from leevalleytools.com
- Insulation – denim 2.5-4″ thick
- Interior surface – 1/8″ birch veneer
- Internet – Verizon MiFi Jetpack 4620L with 5GB monthly data (US$50/mo)
For lots more pictures and details on the Gale’s DIY Sprinter Adventure-Mobile, see the Sprinter page on their TraipsingAbout Web site.

Comments on this entry are closed.